 Your transmission’s vital parts get clogged with sludge and varnish deposits because, just like oil in your car’s engine, automatic transmission fluid (ATF) suffers from heat, friction and electrochemical degradation. In fact, nearly nine out of ten transmission failures are due to over heating and fluid contamination. However, unlike oil, which can be completely drained from your car’s engine, most of the transmission fluid cannot be drained. Instead it stays in the torque converter, valve body and transmission cooler lines, making a complete fluid drain impossible. Typical transmission service removes and replaces only 25% of your car’s contaminated automatic transmission fluid. Adding new fluid to the remaining contaminated fluid can actually cause sludge and varnish deposits to clog filter and further restrict flow. This can result in serious malfunction or even complete failure of your automatic transmission. Now you have an option! Our transmission flush machine provides you with the latest service procedure that safely removes varnish and sludge deposits and cleans all internal transmission components, including the transmission cooler, valve body and torque converter. This service is also the best way to remove wear metals that are slowly grinding away on your transmission’s internal components along with most of the old, contaminated ATF. Your car’s transmission is thoroughly cleaned and protected with fresh ATF and conditioners that revitalize the seals and o-rings. If your car’s transmission is showing any signs of contaminated transmission fluid, slippage, rough or hard shifting, this service is the first thing you should try before it becomes necessary to perform major repair work or even the need for a new transmission. Factory recommendation on most vehicles for a transmission fluid flush is 30,000 to 60,000 miles. Even if your vehicle is not showing signs of contamination, but the mileage is telling you it's time, don't wait! The biggest piece of advise we give is to have regular maintenance performed to keep your vehicle running stronger for longer (hopefully avoiding costly repairs). 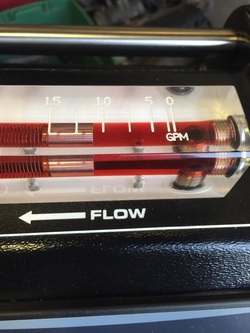 This is what you want your ATF to look like. Give us a call today!
12 Comments
It has been a week since the time change of setting our clocks back and I'm still not jiving with it. The only positive that I get from this time change is that it's not dark when my kids wake me up before 6am. Over the summer I was lucky enough to buy a new-to-me car. I'd leave while the sun was up and get home before the sun set. So I rarely needed to drive with my headlights on. The other night I headed out around 5pm to run a quick errand. Not thinking much about the fact that it was already dark, but just that I forgot something for dinner at the store. Off I start to drive, turning on the headlights, and I cannot see more than 10 feet in front of me! My headlights, being of no use to me over wonderful summer, are pointing pretty straight down! The store is right around the corner from my house, so I wasn't too worried. I'm telling you about this because as I write blog posts about getting your vehicle ready for winter driving (not really different than summer driving here, haha) I've never really thought to include checking the position of your headlights. Most of us are commuting home from work when it's dark now and we need to be able to see! Here is a step by step guide to help you avoid what happened to me:
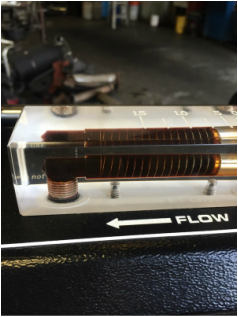
1. Make sure your vehicle is level. Remove heavy objects from the trunk or bed and park on as flat a surface as possible in front of a garage or wall 2. Turn your headlights on and mark the position of the beam on the wall. Mark the vertical and horizontal center line. The centerlines should not be any higher than 3.5' from the ground. Use a carpenters tape to verify the centerlines from each headlight are even. If one is higher, mover the higher mark down to the lower mark. 3. Back up the vehicle 25 ft from the wall. 4. Check your owner's manual to see if your vehicle has vertical and horizontal adjusting screws. If so, then find the screws and adjust one headlight at a time. Use a chair with a jacket on it to block the headlight that you are not adjusting. 5. Adjust the vertical field. The screw on the top of the housing should be turned clockwise to raise the light and counter clockwise to lower the light. Adjust the headlight until the top of the most intense part of the light beam shines directly on or just below the center of the tapeline on the wall. Make sure you turn the lights off to adjust then turn them on the view the adjustments. 6. Adjust the horizontal field. The screw on the side of the housing should be turned to get the right/left adjustment corrected. Try to aim the most intense part of the light beam just to the right of the vertical line. Good luck!! Only 10 days until Thanksgiving! I love the feast. Whenever a fluid is in contact with metal, an electrochemical degradation takes place, which results in a higher than normal level of acid present in any given fluid. This higher acid level, if left unchanged, can result in very costly repairs. As a result, it is recommended to flush your cooling system, and most importantly pH balance your antifreeze at least once every 2 years or 30,000 miles. This will help reduce the acid level and extend the life of your radiator, heater core, water pump, head gaskets, freeze plugs, radiator and heater hoses. Why is it important to have your cooling system flushed by a knowledgeable repair shop with all the right equipment? Why can’t you do it yourself? You have probably heard many times that your cooling system should be -35 degrees, and you wonder why, when it never gets that cold. The reason for this is due to many different factors. The first factor has to deal with water and why water is an important part of the cooling system. Water is the best conductor of heat because the molecules are spaced far apart letting the heat from the engine to move into the water very easily. The problem with water is that it is very corrosive when in contact with metal and can freeze. Ethylene glycol silicone based antifreeze is added to the water to protect the metal, to keep the water from freezing, and to lubricate only the moving parts in the cooling system (i.e water pump, thermostat). So why not just use 100% antifreeze? If you use 100% antifreeze, the engine may overheat in hot weather with or without the air conditioner on. The molecules in the antifreeze are packed tightly together and are unable to remove the heat from the engine as efficiently as water. The condenser for your car’s air conditioning operates much hotter than the radiator; that’s why it is placed in front of the radiator. The radiator dissipates the heat from your air conditioning condenser, thus making the coolant even hotter! With today’s new computer controlled engines the coolant temperature is most important. The temperature sensor tells the computer, along with other sensors, how to adjust the fuel mixture and ignition timing. This may affect engine performance and efficiency. For the best heat removal and metal protection, 50% water and 50% antifreeze is desired. The proper mix is determined by checking the coolant level: -35 degrees equals 50/50. The problem comes when the pH of the water is 7.0 to 7.2 and antifreeze pH is 10.5 right out of the gallon. A 50/50 mix of water and antifreeze would have a pH factor of 8.75. This level is too acidic for today’s cooling systems. The recommended pH level should be between 9.0 and 10.5; this level greatly reduces the acid content that together with electrochemical reaction of dissimilar materials causes electrochemical degradation. To correct the above condition, you need to power flush your cooling system by continuously forcing the coolant under pressure through the engine, radiator, and heater core in both directions at different times. While the coolant is being forced through the system it is also going through a 25 and 5 micron filters to remove all contaminates from the coolant. Once this is done, antifreeze or water is added to the system while circulating to bring it to the desired -35 degrees throughout the system evenly. We then add a pH concentrate while still circulating the coolant to evenly reach a pH level of 10.5 throughout the system. We stop at 10.5 pH because over time, as the hot coolant flows through the system, it will slowly become more acidic as described above. The coolant should stay within the safe range of 9.8 to 10.5 pH level about 2 years or 30,000 miles. We also pressure test the system for leaks, clean the recovery bottle and test the radiator cap to see if it holds the proper pressure. 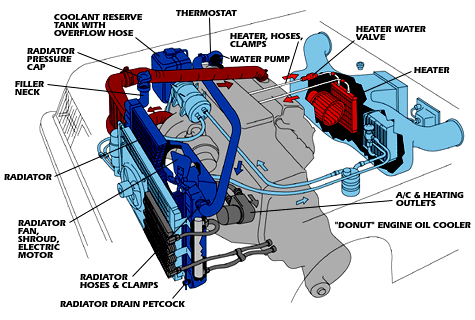 |
Categories
All
Archives
January 2020
|

|
(619) 562-3933 |
 RSS Feed

The Dyno Shop
10042 Prospect Ave, Santee, CA 92071
(619) 562-3933
Business hours:
Monday through Friday, 8:00 am - 5:00pm*
Closed on Holidays
EZ Auto Registration hours:
Monday through Friday, 8:00 am – 5:00 pm*
Closed on Holidays
*Closed from 11:30 am to 12:30 pm daily - but we will be answering the phone :)
Thank you for your continued patronage!

Powered by Benchmark Email

© 2017 The Dyno Shop